anderance – n. the awareness that your partner perceives the relationship from a totally different angle than you – spending years looking at a different face across the table, listening for cues in a different voice = an odd reminder that no matter how much you have in common, you’re still in love with different people.
I often think of anderance since I spend a lot of time with my wife, in daily life, traveling, communicating with phones. I sometimes wonder why she sees things in my differently than I do. Maybe she sees more or less, maybe she has a different view of me than I do.
I realize that who I think I am, and who she thinks I am are a bit different. Not a lot, but a bit.
Probably the same for her.
It’s been 30 years, and it’s still amazing. And I still learn things about her, about me, and about us.
I saw this as a question submitted at SQL Server Central, and wasn’t sure it was correct, but when I checked, I was surprised. If you choose to designate columns as sparse, but you have a lot of data, you can use more space.
This post looks at how things are stored and the impact if much of your data isn’t null.
Another post for me that is simple and hopefully serves as an example for people trying to get blogging as #SQLNewBloggers.
Setting Up
Let’s create a couple of tables that are the same, but with sparse columns for one of them.
CREATE TABLE [dbo].[NoSparseColumnTest](
     [ID] [int] NOT NULL,
     [CustomerID] [int] NULL,
     [TrackingDate] [datetime] NULL,
     [SomeFlag] [tinyint] NULL,
     [aNumber] [numeric](38, 4) NULL,
  CONSTRAINT [NoSparseColumnsPK] PRIMARY KEY CLUSTERED
(
     [ID] ASC
)WITH (PAD_INDEX = OFF, STATISTICS_NORECOMPUTE = OFF, IGNORE_DUP_KEY = OFF, ALLOW_ROW_LOCKS = ON, ALLOW_PAGE_LOCKS = ON, OPTIMIZE_FOR_SEQUENTIAL_KEY = OFF) ON [PRIMARY]
) ON [PRIMARY]
GO
CREATE TABLE [dbo].[SparseColumnTest](
     [ID] [int] NOT NULL,
     [CustomerID] [int] NULL,
     [TrackingDate] [datetime] SPARSE  NULL,
     [SomeFlag] [tinyint] SPARSE  NULL,
     [aNumber] [numeric](38, 4) SPARSE  NULL,
  CONSTRAINT [SparseColumnPK] PRIMARY KEY CLUSTERED
(
     [ID] ASC
)WITH (PAD_INDEX = OFF, STATISTICS_NORECOMPUTE = OFF, IGNORE_DUP_KEY = OFF, ALLOW_ROW_LOCKS = ON, ALLOW_PAGE_LOCKS = ON, OPTIMIZE_FOR_SEQUENTIAL_KEY = OFF) ON [PRIMARY]
) ON [PRIMARY]
GO
Once we have these, I used claude to help me fill this with data. That’s coming in another post, but I uploaded the script here. This is for the SparseTable Test, where I replaced the select on line 59 with NULL values. In the NoSparse table, this selected random data.
If I select data from the tables and count rows, I see 1,000,000 rows in each. However, the Sparse table is all NULL values in these columns.
Checking the Sizes
I can use sp_spaceused to check sizes. The results of running this is below, but here is the summary
NoSparse Columns – 42MB and 168KB for the index
Sparse Columns – 16MB and 72KB for the index
A good set of savings. Here is the raw data:
Adding Sparse Data
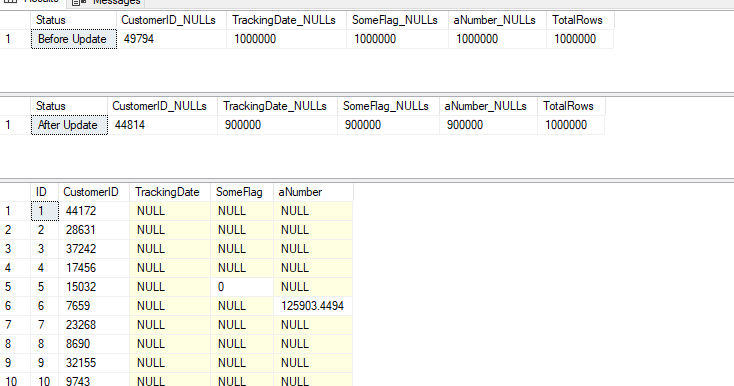
I’m going to update 10% of the rows to be not null in different columns. Not 10% total, but a random 10% amongst all the columns. Again, Claude gave me a script to do this and I have run it. This is the SparseTest_UpdateData.sql in the zip file above.
After running this, I have 900,000 nulls i the TRackingDate, as well as the other columns. You can see the counts below, and a sample of data.
If we re-run the size comparison, it’s changed. Now I have:
NoSparse Columns – 42MB and 168KB for the
index
Sparse Columns – 33.7MB and 88KB for the index
Not bad, and still savings.
Let’s re-run the update script and aim not for 10% updates, but 65% updates. This gets me to only 315k NULL values in the tables, or a little over 70% of my sparse columns are full of data. My sizes now are:
NoSparse Columns – 42MB and 168KB for the
index
Sparse Columns – 67MB and 192KB for the index
My sparse columns now use more space than my regular columns.
Beware of using the sparse option unless you truly have sparse data. I didn’t test to find out where the tipping point it, but I’d hope it was less than 50% of data being populated.
SQL New Blogger
This is another post in my series that tries to inspire you to blog. It’s a simple post looking at a concept that not a lot of people might get, but which might trigger a question in an interview. That’s why you blog. You can share knowledge, but you build your brand and get interviewers to ask you questions about your blog.
This post took a little longer, about 30 minutes to write, though the AI made it go quicker to actually generate the data for my tables. There were a few errors, which I’ll document, but pasting in the error got the GenAI to fix things.
This post showed me testing something I was wondering about. In a quick set of tests, I learned that I need to be careful if I use a sparse option. You could showcase this and update in 10% increments (or less) and keep testing sizes until you find when there is a tipping point. Bonus if you use a column from an actual table in your system.
It’s time for T-SQL Tuesday again and this time Todd Kleinhans has a great invitation that is near and dear to my heart: mastering a new or existing technical skill. That’s been a lot of what I try to inspire people to do at SQL Server Central.
Make a plan and start learning. And respond to Todd’s invitation and write down your plan and share it. Start a blog, use Linked In, whatever. Spread the word on socials as well.
If you want to host, I’m always looking for hosts for T-SQL Tuesday. Ping me on Twitter/X, BlueSky, or LinkedIn.
Mastering a New Tech Skill
Like Todd, I’m interested in AI and I think it will dramatically change the world in the coming future. I also think it’s a bit of a technical skill that is important to learn. I wrote about this a bit in last month’s post.
How do I work with a GenAI model and improve my technical skills? The easy answer is more and more. I’ve been having more conversations with Claude, usually looking for ways to help me solve a problem or write code, and then ask the GenAI to explain things.
However, I wrote awhile ago about an experiment in helping someone else learn something: Can an AI Help Me Find a Job?. For me, I’ve been looking a bit more at DataBricks, as I hear this from clients all the time. I wanted to gain some skill here, so I decided to ask Claude to help me.
I got a good outline of things to do across a few months. I then asked for references and got some:
The next stage for me is to start embarking on this journey a few nights a week and learn some things that might help me both in my job, and potentially in a future position if I need one.
My Complete Outline from Claude
Here’s the end result, with links.
Databricks Learning Outline with Resources
Phase 1: Foundations (1-2 weeks)
Understanding the Basics
What is Databricks and why it’s used
Core concepts: clusters, notebooks, workspaces, and Apache Spark
Databricks architecture and modern data stack integration
Recently I was working in VS Code and I saw a walkthrough for the new Copilot chat features. I decided to give those a try in trying to get some information from my SQL Server instance.
This post walks through a few things I did with this GenAI agent. There is a video walkthrough at the end.
Note: I have copilot access set on VS Code as a part of my employer’s benefit.
One of the Walkthroughts recently mentioned copilot. If I click the “More” at the bottom right, I’ll get this image. You might see something different, but Id’ expect you have a Copilot walkthrough if you can use Copilot. I choose the 4th one down (where the mouse pointer is).
This opened a Copilot pane. There were a few items, and you can see on the left in the image below, some have checkmarks. I’d explored these before.
If I scroll up, I see the one I wanted to get, which was “chat about your code”. I picked this one. This opened a blade to the left when I clicked the blue “Chat with Copilot” button.
I had read there are these @ agents (look up at the right side) and decided to type “@”. I saw a list of things.
Lots of places to work, but I choose the @mssql agent, since this is the place I tend to work. In the lower pane, I typed a question.
Above this (still in the left blade), I got a response.
Below this, I got some text and code explaining how to access a list of databases on various platforms. Not sure why MySQL is first, but I’m assuming this is alphabetical. For SQL Server, I saw this. This is a reasonable answer, with some help on how to execute it.
I then decided to connect to my local instance. I have the MSSQL extension, so I clicked that and got a connection.
Rerunning that query produced the same response. However, when I opened a query window, I got different results. Note the little database icon on the left, below my prompt, with “Untitled-1” next to it. This is the context, which I also saw added to the lower prompt box, just above where I would enter a prompt.
However, this didn’t work. After a few minutes, I got this.
and this. The LLM is trying, but can’t seem to get a query to run. It did try.
I then decide to move on.
Getting Results Back from Questions
This isn’t really the type of thing I’d do, but I decided to try and get some info from a database. The one above isn’t that interesting, so I switched to asking the model some questions. Here’s the first one, where I don’t remember the exact table name, but I ask.
It’s queried the database, and there isn’t a player table. However, it continues to look and finds dbo.players.
Even better, once it has the answer, it also provides a little more info. Maybe good, maybe bad. This reminds me of talking with a person that gives me more information than I asked for.
I try something else. Let’s get some metadata, since I clearly don’t remember what’s in this database.
I get a nice response, with some guesses about what information is contained inside these tables.
OK, can I query for information. I’ve always been a bit more of a hitter than a pitcher, so I’ll ask a question. This isn’t asking to join specific tables, but get me an answer.
It worked, though to be fair, I tabbed over to SSMS and wrote this query in the same time (with SQL Prompt) as the Copilot agent. Cool to see as I’d forgotten Thome and Vlad were up there.
While I got the answer, I didn’t get the query. I asked for it and got it, with an apology.
I’ll do something else. Who played the longest. Might be a somewhat funny query to write for a quick answer. I’d have to join a few tables and look for a sum.
It likely remembered I wanted the query, so that was included, with an explanation. However, it only looked at the batting table.
I asked other questions about fielding and pitching and got those answers (Nolan Ryan, 27 years with fielding stats and pitching stats. So I asked that:
Below this, I see the two players who tied, which Copilot noted.
The code provided only returned one player. I checked, which is something that you should always do. I asked if I could get better code. I got a few options, and I liked the RANK one, so I tried it and it worked.
Slightly annoying, but when I think about this type of conversation with someone else, especially a junior dev, I might have the same results and iterate this way.
At this point I also asked about databases, and I got a result. Maybe I needed a query to run first? Not sure why this works now.
Summary
This was an interesting set of things I could get done with this agent in VS Code. It’s not amazing, but it was helpful. I could tackle some light query tasks or db query ones while also handling some other work. In this case I wasn’t in the zone, trying to code or decode a database schema. Instead, I had a few things to try, and I let the agent work while I tabbed over to close some emails and chats.
In a job where I might need to find info from an unfamiliar database, this could be helpful in getting things done, though it’s hard to know if it’s slower for me if I were focused on ths all the time. The agent can find some info without me, but it also failed in a few cases. I started to try and get other things done when I noticed delays in responding and some hung queries.
Learning to use an AI agent to help you is a skill, and it’s one that takes time to develop.
I’ll look at some more practical tasks in the next post.
Video Walkthrough
Here’s a video walkthrough of most of the stuff in this post. It differs slightly as working with LLMs is not deterministic.