Tag: Flyway

  • Flyway Tips: AI Deployment Script Descriptions

    With the AI push being everywhere, Redgate is no exception. We’ve been getting requests, demands, suggestions, and more about how to add AI into our products and help developers and DBAs be more productive.

    One of the areas we’ve started to add some AI is in Flyway Desktop (FWD), with a few features designed to help reduce the cognitive load and context switches needed while developing code, and help users better understand what changes they’re making in their systems. This post looks at one of those changes, which is in preview (as of Jan, 2026).

    I’ve been working with Flyway and Flyway Desktop for work more and more as we transition from older SSMS plugins to the standalone tool. This series looks at some tips I’ve gotten along the way.

    Understanding Deployment Scripts

    In Flyway, we call the deployment scripts “migration scripts”, but they are the same thing. These are scripts that are changing, altering, or evolving our database schema in some way. New or altered objects, various schema items, and more.

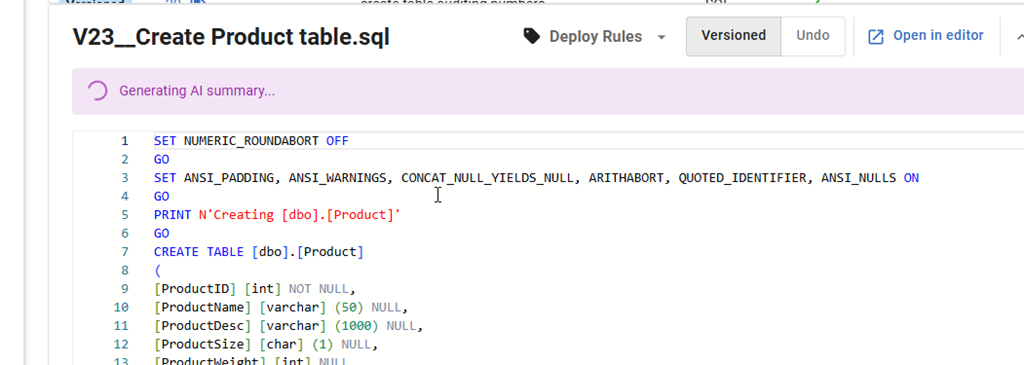
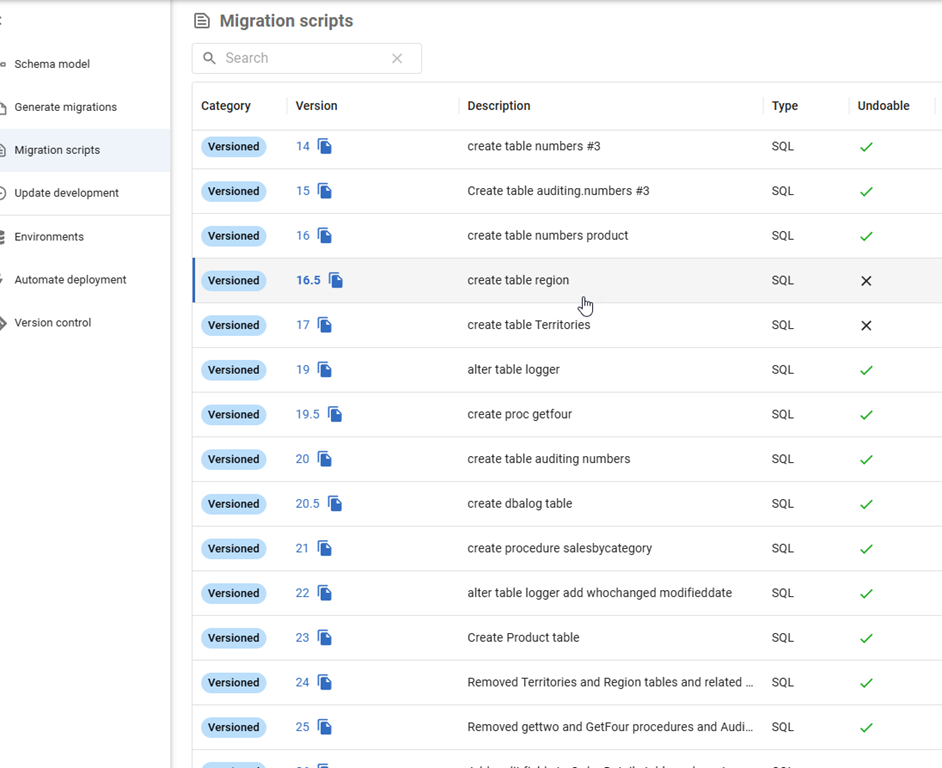
    When a developer creates a migration script, they often do this close to the time they are making the changes in development. Not always, but I find a lot of customers change something, test it, and then make the migration script. Guidance for a lot of customers is to keep the migration scripts simple and easy. For example, here’s one I have that creates a simple table. If you look in the image on v23, which says “Create Product Table” in the description, that is what it does.

    2026-01_0161

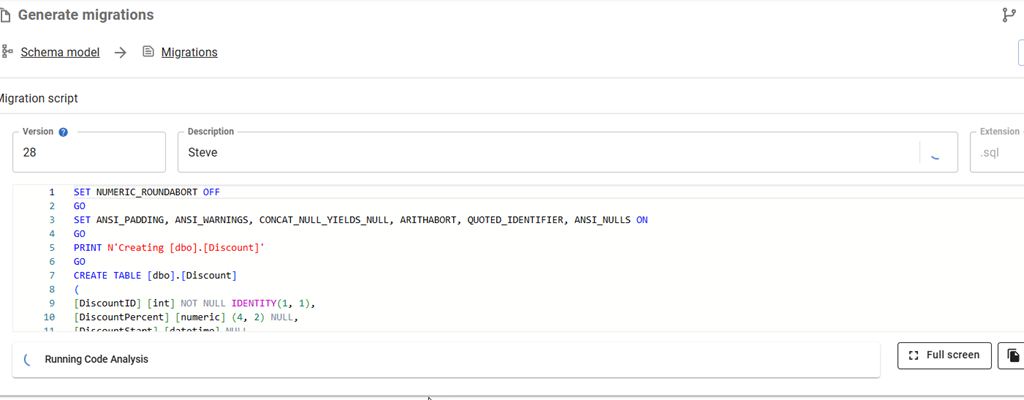
    If I click on this line, I see the script shown below the name (V23__Create Product Table.sql). The new thing just below in this image is that an AI summary is being generated.

    2026-01_0162

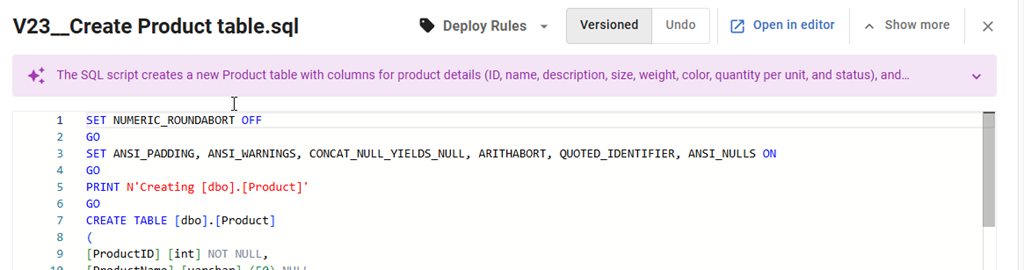
    In a few seconds, this changes. I get the summary of the table. In this case, it says I have a new table with some columns.

    2026-01_0163

    If I expand this with the drop-down on the right, I see the full summary. This includes telling me a PK is being created, which is good info. I could look through the code, but the settings, the PRINT statements and more make this harder than it should be.

    2026-01_0170

    What about a more complex script? If I pick a different one, such as V24__Removed Territories and Region tables and related constraints and procedures, I get an OK description that lets me know a few things are being changed. I wish this had a little more detail in it, such as the tables on which FKs are being dropped, and maybe a list.

    2026-01_0164

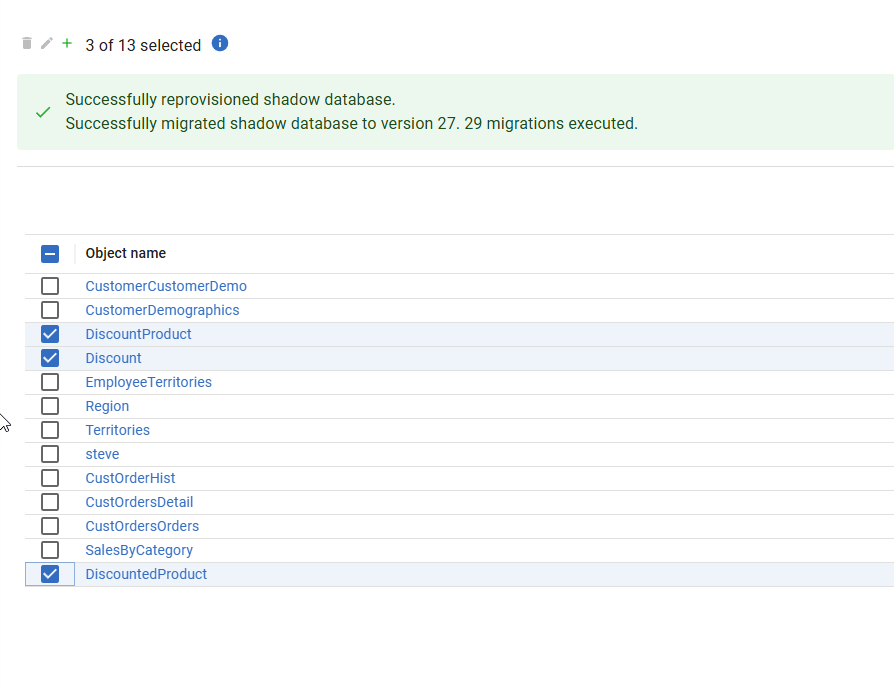
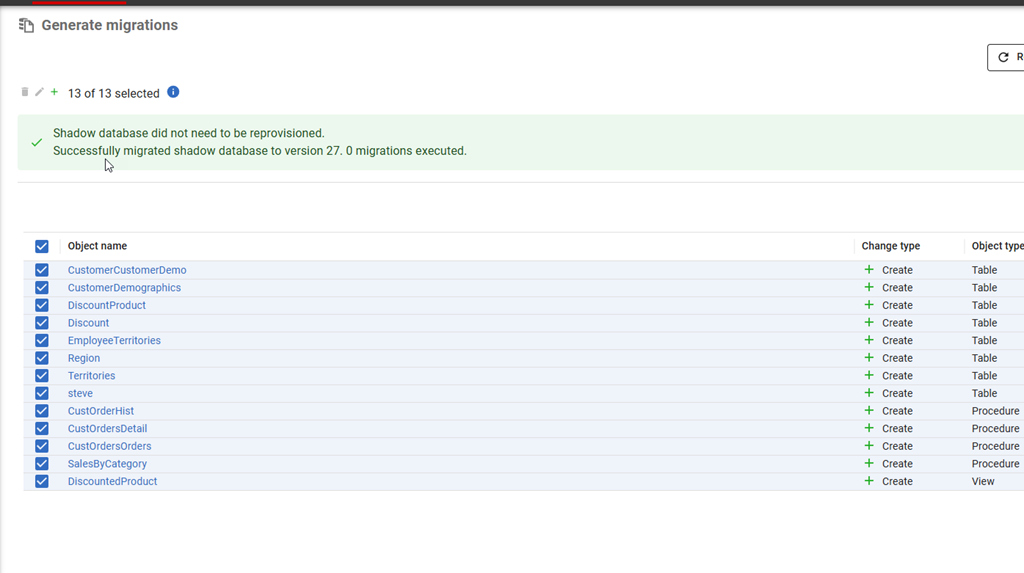
    Let me create a whole new set of objects. In this case, I’ve added some discount features in a bunch of tables. Here is the list of objects I added to the migration script.

    2026-01_0168

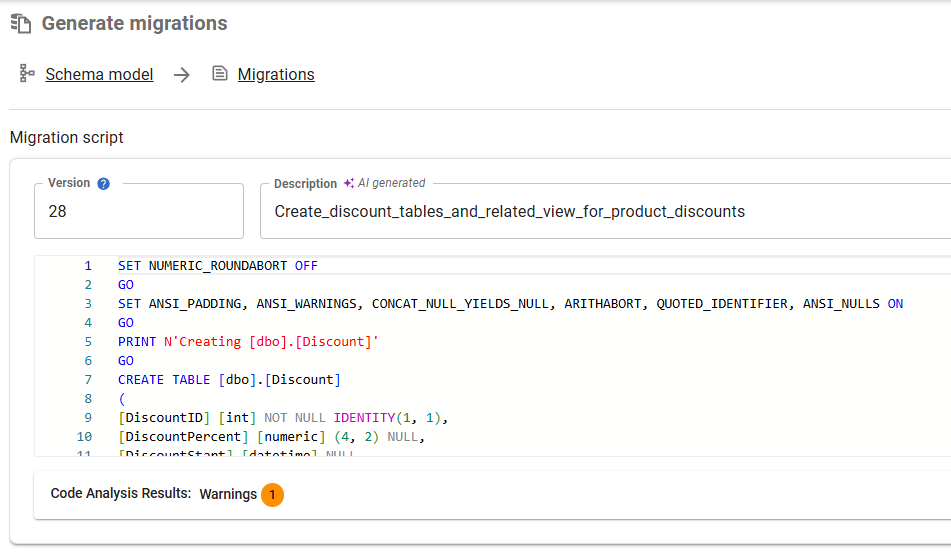
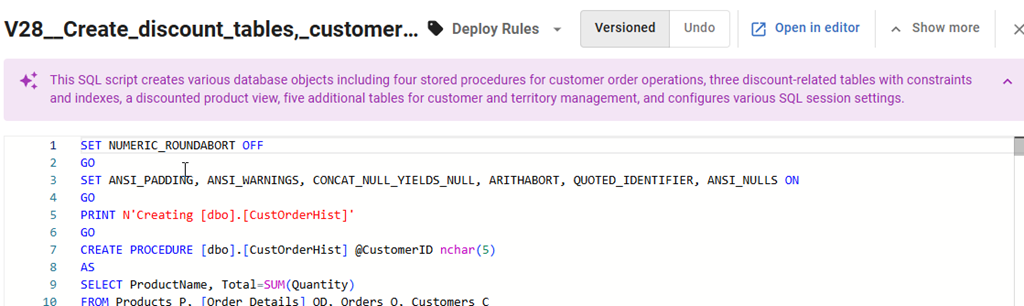
    When I generate the migration script and then click on it in the Migration Scripts tab, I see this description.

    2026-01_0169

    That’s an interesting description, as I see that there are territory and customer tables, which I’d forgotten I added. I was working on them and added them, but hadn’t committed them. I added the discount stuff (3 tables and a view) in a dev session today, and then selected everything to save and include in a migration script.

    This is one of those areas where the summary helps me remember what’s in here, and in this case, I’d want to delete this script and re-generate it with a different set of object changes. Then a second migration script with other changes.

    Enabling AI Features in Flyway

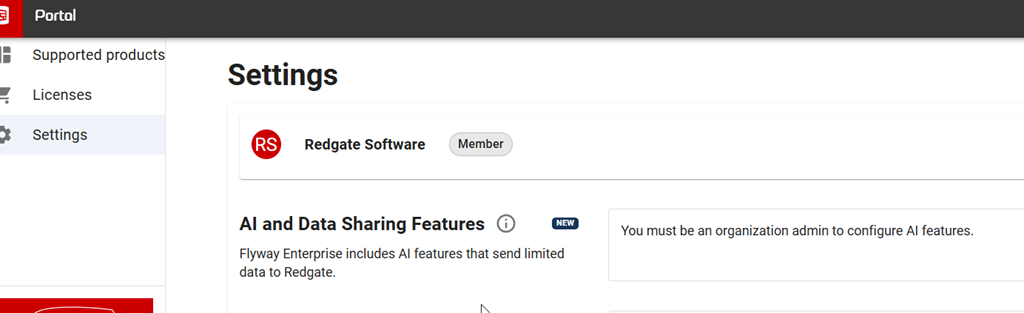
    This is a preview feature as of Jan 5, 2026 as I write this. To get this in your FWD, your organization needs to have enabled AI features in your portal. I’m just a member, but whoever is an admin for your Redgate products would find it here.

    2026-01_0173

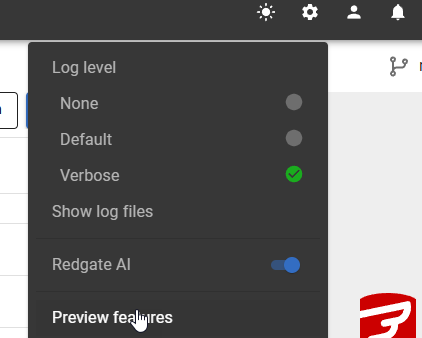
    In FWD, you need to look at the Preview Features item under the config menu.
    2026-01_0171

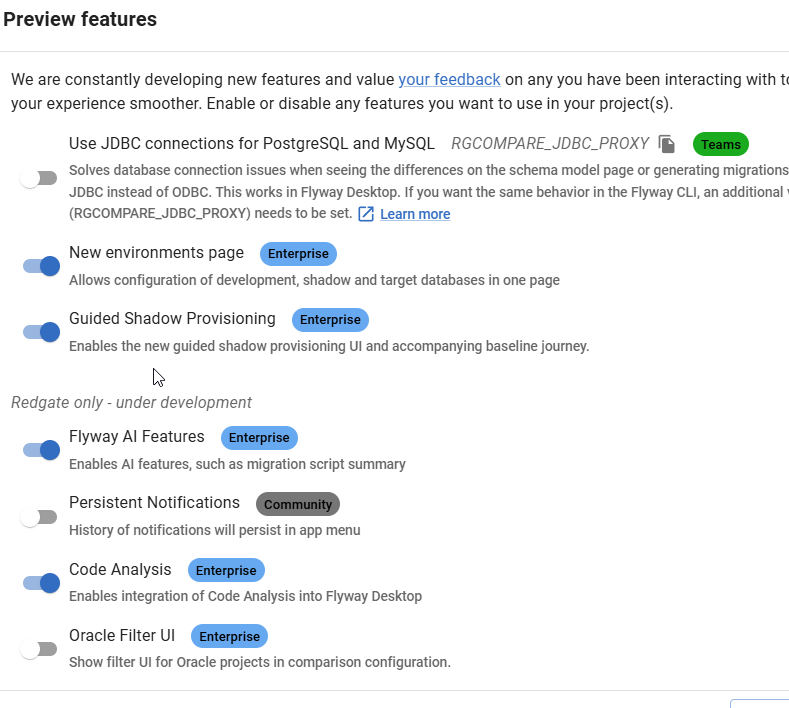
    In this area, you can enable or disable features as needed. I see these marked as Red-gate only, but I think they are supposed to be released to some customers by this time. It’s likely I need to upgrade my FWD, which I’ll do when I have time.

    2026-01_0172

    Once you do this, you should start seeing some AI stuff with the purple/pink shaded area and the sparkle icon that we’re all seeing everywhere.

    2026-01_0174

    Summary

    This post shows one of the Flyway AI features that we’re adding to help you deal with the chaos and complexity of database development in your environment. This features tries to summarize the details in your migration script and provide you a summary.

    This isn’t perfect, but as you look at scripts, it fairly quickly gives you a look at what’s included without you having to read all the code. You should double check the code and be sure it’s what you expect, but if you’re looking through a few scripts for a particular change or impact, this might help save you time.

    There is a limit to the amount of stuff we send to the LLM to summarize. I can’t remember (or find) the limit, but very large scripts aren’t summarized, and you’ll see a message to that effect.

    This feature is documented, but we are likely to enhance and change it a bit, so all feedback is welcome. If your organization doesn’t want you using AI, and you could share some schema from a migration script, I’d be happy to test it for you and see what summary is produced and send it back to you. Ping me on X/LinkedIn/BlueSky if you want.

    Flyway is an incredible way of deploying changes from one database to another, and now includes both migration-based and state-based deployments. You get the flexibility you need to control database changes in your environment. If you’ve never used it, give it a try today. It works for SQL Server, Oracle, PostgreSQL and nearly 50 other platforms.

    Video Walkthrough

    See a video of me looking at this feature below.
  • Flyway Tips: Automation Assistance in Flyway Desktop

    I was chatting with the product managers at Flyway and one asked me whether I’d seen the new tab for Automation in Flyway Desktop. I hadn’t and decided to take a quick look at how this works and what’s useful. This post looks at the new feature.

    Tl;Dr this is a good way to start learning how to move to a more DevOps, automated way of deploying changes.

    I’ve been working with Flyway and Flyway Desktop for work more and more as we transition from older SSMS plugins to the standalone tool. This series looks at some tips I’ve gotten along the way.

    Working with Flyway Desktop

    For a lot of customers, it’s not too hard to setup a project and start to capture code in a Git repo. However, adding in automation gets challenging for many, especially as the docs are hard to understand if you don’t already have some knowledge. I find that CI/CD is a bit of a chicken and egg challenge as we try to learn to get better, but knowing what to learn and do requires knowledge.

    Which we don’t have.

    In any case, I’ve taken an existing Flyway project where I am capturing some code. You can see the project below, with objects on the right. The database and the repo have the same object code and are in sync.

    2025-11_line0127

    Let’s add a few new objects to this database in SSMS. You can see below I’m adding a new table and altering a proc. I’m also refactoring slightly to not keep the old style join convention in my proc as I add a new join.

    2025-11_line0129

    Once I do this, in Flyway Desktop (FWD), I see my changes. I’ll save these to the repo and then generate a migration script. I won’t show that as it’s not important.

    2025-11_line0130

    Once I’ve done this, I know I want to deploy code. If I go to Migrations, I can see I have these two scripts ready to go to QA, and I can deploy them with FWD manually. However, I don’t want to do that.

    2025-11_line0131

    I want some automation. How does FWD make that easy? Let’s see.

    The Automation Tab

    There’s a new tab on the left, which is the Automation tab.  I’ve expanded the left menu out and you can see it, but it’s a lightning bolt, which I might never have noticed (hence this post).

    2025-11_line0132

    If I click this, I get a little explanation at the top, a few links, and then some CLI based code. This last part is the important part of what I need to move to CI/CD.

    2025-11_line0133

    If you look at the code closely, you’ll see some placeholders in angle brackets for the environments I need. The code looks like this:

    2025-11_line0134

    Above this, there are two drop downs where I can select my build and target environments. Build is the CI portion, and it’s a good idea to have a place to build code separate from QA. This lets me validate things, and more importantly, run some code analysis checks, summarize changes, and detect drift.

    I’ve expanded the Build drop down below and you can see I have my environments listed, and I can also manage them from here. There is also an Environments tab on the left menu just above Automate Deployments that looks like a database icon.

    2025-11_line0135

    Once I select an environment, the code changes to reflect this. That makes things easier to automate as I can take these commands and drop them into a task in my CI/CD tool.Note in the image below that I’ve selected NWInt and the code shows target2. The code needs the ID (or PK) of the environment, but the display name I entered is shown in the drop down. Trust me, these match.

    2025-11_line0136

    I’ll also select a target and then open up a CLI to run the first item on line 5. I did have to auth, but this runs successfully. No doc checks, no experimenting, the command ran.

    2025-12_0116

    I’ve never saved any snapshots and so the drift doesn’t work right away, but I’ll get the dryrun script. When I run this, I get a summary from the CLI.

    2025-12_0120

    Then I can see the report (see above output for the path at the end. When this opens, on the Dry Run tab, I see my scripts.

    2025-12_0121

    Note, I did use the drop downs in FWD to select the environments I need for this.

    Very cool.

    Summary

    One of the challenges with using Flyway is that there are a lot of settings, options, and more that one must learn to take advantage of the solution. Our docs continue to improve, but even for someone that has been using Flyway for a few years, I have to constantly check out things work. Plus, the teams are adding features on a regular basis, so it can get confusing to learn the new things.

    This automation tab is really helpful to shortcut some of the things I need for the various environments in my project. I’m going to start using some of this in a new project, and so should you.

    Flyway can do much more, and for smoother automation, check out Flyway Enterprise.

    Flyway is an incredible way of deploying changes from one database to another, and now includes both migration-based and state-based deployments. You get the flexibility you need to control database changes in your environment. If you’ve never used it, give it a try today. It works for SQL Server, Oracle, PostgreSQL and nearly 50 other platforms.

    Video Walkthrough


  • Friday Flyway Tips: State-based deployment with Flyway

    I was asked about state-based deployments in Flyway, so I decided to show how this can work with a quick demo. This post walks through the process.

    I’ve been working with Flyway and Flyway Desktop for work more and more as we transition from older SSMS plugins to the standalone tool. This series looks at some tips I’ve gotten along the way.

    A Steady State

    I have a Flyway project setup already. I’ve refreshed the screen and as you can see here, there aren’t any differences between my database and my project in version control.

    2025-02_0349

    In SSMS, I’ll create a new table in my FWState_1_Dev database. This is where my project is pointed in Flyway Desktop (FWD).

    2025-02_0350

    I’ve created a new table and it exists. If I  check my QA database, FWSTate_3_QA, I don’t see this object.

    2025-02_0351

    If I refresh my project in Flyway Desktop (FWD), I’ll see my change. I can pick it and see the code, and then I’ll click “Save to project” in the upper right.

    2025-03_0106

    Once the code is saved, I see the confirmation and I have the code ready for commit to a VCS. I won’t do that here, though you should.

    2025-03_0107

    What I want to do now is go to the left bar and select “deploy”, which is the rocket icon.

    2025-03_0108

    When I do this, I see a blank screen, as I don’t have a target. I can select that on the right if I’ve configured one.

    2025-03_0109

    If I pick the drop down, you will see my dev and QA environments. I made changes in the dev environment, and want these changes to go to QA. I can also click the “Manage environments” button. Let’s do that.

    2025-03_0110

    When I do that, I see a list of environments. I use this a lot to double check that I’m deploying to the right place for this project and where to look for changes. If you work across multiple projects as I do, this is handy.

    You can see below I’ve selected QA with the green checkmack in the radio button. Once you pick your environment, you can click “Confirm”. If you need a new target, click Configure.

    2025-03_0111

    I return to the deploy screen, and this time I see the changes that have not been deployed. In this case, that’s one change, but if there were more, I would see them. I can click any object to see the changes, and once I’ve selected what to deploy, I can click deploy.

    2025-03_0113

    When I click Deploy the script is generated and I see a preview. I also can see that this is from my schema model on disk being deployed to the Qa database. That’s handy as this might take a few minutes and who knows what distractions might appear in my life.

    I also can execute this as a transaction or not, and copy the script if I want to examine it in another tool (or format it like SQL Prompt).

    2025-03_0114

    When I click Deploy, I need to confirm my deployment. Always a good step, though I think if you do this often, your muscle memory will be ready to just click confirm.

    2025-03_0115

    Once the deployment runs, we see a message this was successful.

    2025-03_0116

    If I now check the QA database, I see the object.

    2025-03_0117

    Summary

    This post has shown how you can perform manual deployments of changes in a state-based method using Flyway. This is a quick way to move your changes from one machine to another.

    Flyway can do much more, and for smoother automation, check out Flyway Enterprise.

    Flyway is an incredible way of deploying changes from one database to another, and now includes both migration-based and state-based deployments. You get the flexibility you need to control database changes in your environment. If you’ve never used it, give it a try today. It works for SQL Server, Oracle, PostgreSQL and nearly 50 other platforms.

    Video Walkthrough

    Here is a video of the process below.

  • Friday Flyway Tips: Autopilot in 10 minutes

    The Solutions Engineers at Redgate recently released an Introduction to Redgate Flyway Autopilot course on our Redgate University. They’ve been working on this for quite some time to help people get started with Flyway in their own environment. It’s gotten smooth and slick, so I’m going to set this up in 10 minutes in this post and video, but with a twist. I’m using my schema to show you how easy this is.

    I’ve been working with Flyway Desktop for work more and more as we transition from older SSMS plugins to the standalone tool. This series looks at some tips I’ve gotten along the way.

    Getting Started

    The course walks you through a few things. These include:

    • Getting Git
    • Installing Flyway Desktop
    • Having an Azure DevOps or GitHub account
    • Having a SQL Server or PostgreSQL server (I’ll use SQL Server)

    You will also get a Redgate Token and set up a local runner. I won’t detail those steps here, but I will have them in another post. The video will also skip those steps.

    Creating a Repository

    I’m working in GitHub, but you can do this in Azure DevOps. Others work, but those aren’t in the course. The main thing to do is go to the official Redgate repo at: https://github.com/red-gate/Flyway-AutoPilot-FastTrack

    This brings you to this site:

    2025-01_0099

    From there, don’t clone or fork, but use as a template. This is in the upper right corner.

    2025-01_0100

    When you click this, you get the Create a new repository page, that looks like this. If you’re familiar with GitHub, this looks like any other repo. Give it a name, which must be unique in your org. I added FWAutopilot as I already have an “Autopilot” repo that is public.

    2025-01_0102

    You can make this public or private, but just be aware of this from the standpoint of your org, especially if you add internal schemas. You can also set a description.

    Once this is created, you’ll see the repo in your org. Here’s my Autopilot repo:

    2025-01_0103

    This is a copy of the template all set up. Now, on to Flyway Desktop.

    Creating a Project

    In Flyway Desktop, I’ll click the drop down by Open Project and select Open from Version Control.

    2025-01_0110

    Here I’ll paste in the URL of my repo. I also check that the folder for the local clone is valid. In my case, I tend to put things in Documents/Git, but you might have your own standard.

    2025-01_0136

    Once this clones down, you can see a repo in the path above that looks like the online repo. Flyway Desktop will also refresh the schema, which should give you this error.

    2025-01_0210

    This is because the databases don’t exist. As you can see, I’ve filtered to databases with “auto” in the name and I have nothing.

    2025-01_0207

    If I use the file | open in SSMS, I can go into the repo and into the Scripts folder, where I see this:

    2025-01_0219

    I want to open the CreateAutoPilotDatabases.sql script, which looks like what you see below. This creates 5 databases and adds schema objects to one of them. The goal is for Autopilot to use Database DevOps and Flyway to migrate these changes to other databases.

    2025-01_0220

    Run this, and I see different databases. I’ve refreshed things, and you can see Prod has nothing but Dev has objects.

    2025-01_0221

    Now that I have a db, let’s refresh Flyway Desktop. Now I see no changes.

    2025-01_0222

    Note: If you aren’t doing this on your localhost instance, then you can edit the connections to the dev database (and other databases).

    Adding Our Own Schema

    Don’t start deleting schema objects yet, but you can add your own. I’ll do that. I have a script that contains a schema for baseball data. The beginning is shown below, but I’ll run this in my AutopilotDev database.

    2025-01_0223

    After I do this, I’ll refresh Flyway Desktop again and I see my tables. This is a partial list as the full list scrolls off the screen.

    2025-01_0224

    I’ll select all these from the checkbox at the top next to Object Name and then click “Save to project” in the upper right. This writes the CREATE scripts for all objects to the schema model, as you can see below in the update message.

    2025-01_0225

    The next step (shown at the bottom) is to generate a migration script. I’ll click that.

    I get the screen below, which shows me all the changes that have been made to objects. I can select one or more of these to put into a migration script (deployment script). If I don’t select them all, then I will see those I haven’t selected re-appear here and I can add them to a different script. To keep this simple, I’ve selected them all.

    2025-01_0226

    When I click “Generate script” in the upper right, Flyway will create a script containing all the objects I’ve selected with the appropriate create/alter/drop code inside. Here is  my one large script. You can see the start of the script below. If we scrolled, we’d see the CREATE for all the tables in here.

    2025-01_0227

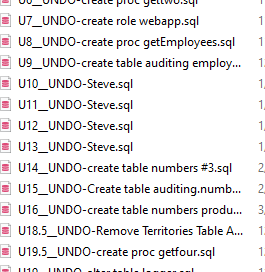
    This project is configured to automatically generate an undo script, so below the above part, there is the undo script. Again, this is just the beginning of the script. However, you can see before we drop tables, we need to remove constraints.

    2025-01_0228

    Once I’m happy, I can click save and this is written as a migration script (and an undo script).

    2025-01_0229

    I can click Verify, which essentially runs these scripts against my shadow database, but I don’t do that if I haven’t altered the scripts. You can if you want.

    Now that we’ve made some changes, let’s commit those. On the right side of Flyway Desktop is the VCS blade. You can see I have 28 changes in my repo.

    2025-01_0230

    If I click the “28”, this opens to the commit tab. I can also click the arrow at the top and select the commit tab. In here, I see my changes and I can include all of them or some of them and write a commit message.

    2025-01_0231

    I’ve selected them all and written a message, so I’ll click the drop down by commit and select the combined Commit and Push.

    2025-01_0232

    If I check my repo, I see this commit included. You can see this altered the schema-model and migrations folders.

    2025-01_0233

    Now we need to keep this Database DevOps flow going and deploy our code.

    Setting Up Runners

    If I check the Actions tab in my repo, I see there are two workflows configured. They are the same, but one works for Windows and one for Linux. I don’t have any runs yet and I haven’t configured a runner.

    2025-01_0234

    If I go to Settings in my repo and the Actions | Runners area, I’ll see this. The runners are the agents that execute your code. In this case, I need to setup a new one. I’ll detail that in another post.

    2025-01_0235

    Once I have a runner set up, I should see something like this:

    2025-01_0251

    Adding Secrets

    Flyway is a licensed product, so I need to tell the runner that it is licensed to use the product. If you don’t have a license, this system can get you a 28-day trial, but if you have one, you can just use that.

    If you go to the token section of the Redgate portal, you should see something like this:

    2025-01_0242_thumb1

    If you click New Token, you get a new token.

    Note: I’ve deleted this token, so this code doesn’t work.

    2025-01_0243_thumb1

    Don’t close this, but open a new browser tab for your repo. Go to the Secrets | Actions section under Settings. You should see this. Click New repository secret.

    2025-01_0244_thumb

    The documentation notes you need to add two secrets: FLYWAY_TOKEN and FLYWAY_EMAIL. These are essentially secret variables picked up by the automation. When I click new, I add the email like this.

    2025-01_0245_thumb1

    I added the token in the same way, pasting in the token from the portal. When I finished, I see two secrets.

    2025-01_0246_thumb1

    Run the Automation

    Check your production database (and the test one). There should be no objects, which is what we saw above.

    Now, go to the Actions section of your repo. Click the Windows workflow on the left (or Linux if you used that).

    2025-01_0247_thumb1

    Now on the right, click Run workflow, and then Run again in the pop up.

    2025-01_0248_thumb1

    In a minute, your web page should show this running with a yellow circle before the name.

    2025-01_0249_thumb1

    Your CLI window should look like this as well, with a job running.

    2025-01_0250_thumb1

    If you click then name of the run on the web page, you should then see the three tasks. Here my build completed before I could get the screenshot, but yours likely has the yellow on the build database.

    2025-01_0251_thumb1

    If I click any of the tasks, I’ll see the logging as they run. In this shot below, I’ve clicked the running prod deploy, as that was running when I was ready for the screen shot.

    2025-01_0252_thumb1

    The output scrolls along and can be hart to follow, but after any of these are complete, you can click on them and see the task outline. Each of these items below can be expanded by clicking on the angle bracket. You can see I’ve expanded the Migrate Test DB task.

    2025-01_0254_thumb1

    However, most of the time we assume we have a repeatable, reliable execution of our migration, so we don’t care. The proof is in checking the databases.

    Here is my refreshed AutoPilotTest database.

    2025-01_0255_thumb1

    and here is the AutopilotProd database.

    2025-01_0256_thumb1

    I moved code from dev –> VCS –> test –> prod without executing it anywhere past Dev. This is the way changes should be made to test them before they hit prod.

    We should also have feature branches, PRs, and more, but that’s beyond the 10 minutes to get started. From here, I could easily make other changes in dev and get them deployed by clicking a button in GitHub.

    Summary

    This process took me ten minutes. To be fair, I’d tested it a few times, but in knowing what things are needed in the docs, it took me ten minutes, which I show in a video below.

    Flyway is an incredible way of deploying changes from one database to another, and now includes both migration-based and state-based deployments. You get the flexibility you need to control database changes in your environment. If you’ve never used it, give it a try today. It works for SQL Server, Oracle, PostgreSQL and nearly 50 other platforms.

    Video Walkthrough

    I’ve got a video of me doing this in 10 minutes.