Category: Blog

  • Virtual Lab – Creating Differencing Disks

    This is part of my series on building a virtual lab for use with SQL Server and Windows. You can see the entire series here: Building a Virtual Lab with Hyper-V.

    The whole point of virtualization is better use of resources. Whether it’s CPU, storage, networking, power, etc., we are trying to save having to purchase 5 or 6 machines and connect them all, pay for them, etc. It’s much, much easier to use virtualization.

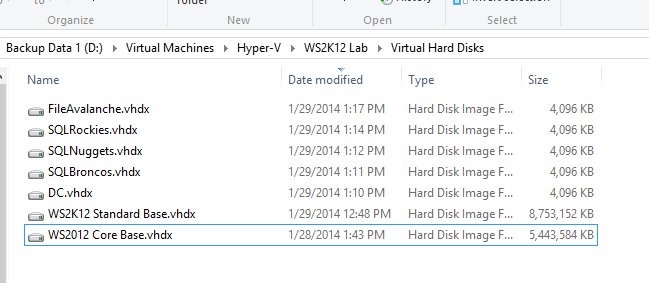
    This is especially true of storage. When we build a lab, we don’t want to have to allocate a ton of space for our systems. In my case, for my design, this is what I want to end up with.
    virtlab_o

    From my last post, I had the bottom two files already set up. These are my installations of Windows Server 2012 R2 Standard and Core, sysprep’d and ready to use.

    Differencing – Saving Space

    The idea in differencing disks is similar to the snapshot feature I used in VMWare to do this same process. I take a base disk, and create a “copy” of it. Except the copy doesn’t have everything from the base disk. Like a database snapshot in SQL Server, if I need to read something that’s in the base disk, I reference that. If I change something, or add something, I read from the copy.

    As you can see above, I have 5 small disks at 4MB and my 2 large base disks. Each of the small disks is a differencing disk off either the Standard or Core base installations.

    I created these by selecting New Hard Disk in Hyper-V Manager

    virtlab_i

    After the intro screen, I make sure I’ve picked VHDX.

    virtlab_j

    At the next screen, I choose the differencing option.

    virtlab_k

    Now I need to pick a location for the copy. On my setup, I’m trying to keep this lab contained, so I have a WS2K12 Lab folder. I choose that as my location for the differencing disk. I give it a name, in my case, I’m using “Function” concatenated with the name of the Windows host. As seen below, my file server will be named “FileAvalanche.vhdx”.

    virtlab_l

    Next I choose the parent disk. this is the base image. Depending on what I had in my design, I choose the Standard or Core images for various machines.

    virtlab_m

    I get a summary where I can see all my options, and then click finish.

    virtlab_n

    I do this five times and all of a sudden I have a lab.

    A few things. Use some naming convention so you can tell which disk is which. Also, make sure you stick things in a location. I set a specific folder location for my VMs and disks, and then altered the Hyper-V Manager settings to default to this folder. On my machine that’s D:\Virtual Machines.

    That helps me keep things contained, and it also means that when I want to copy a VM for a backup or to another machine, it’s easy.

  • Powershell in a Month Day 17 – Security Alert

    This is part of my Powershell Challenge, to learn more about PowerShell (PoSh) using the Learn Windows Powershell 3 in a Month of Lunches book by Don Jones.

    Security. It’s important, and I was thinking this chapter would show us more about changing security. Instead, this chapter is really an outline and discussion of what security method are built into the PoSh shell. The chapter first emphasizes that the PoSh environment doesn’t bestow and special rights or abilities to the executor. The commands just execute, or fail to execute, base do on the rights you have in windows already. I can see that as some of the commands I run at times fail when I haven’t run the shell as an administrator.

    From there the chapter talks about the different execution policies, which I haven’t thought much about. I end up typically changing the execution policy on each VM initially so I can run scripts to Unrestricted. I know that isn’t recommended, but I typically need things to just work.
    I also hadn’t realized that I could set this in a GUI in Windows. That’s good to know, and I suspect, it’s another example of where Windows is implementing PoSh commands under the hood of the GUI. It would be nice to see a Trace for PoSh to watch commands come through GUI actions.
    The chapter finisheds by talking about the digital signing of scripts, how it works, and what you need to do. I haven’t messed with this and it’s not a part of the lab, but it’s something I’d probably do in a large organization, or even any organzation to be sure that hte code that’s being automated and run is actually the code that has been tested.
    Overall, a short chapter. Slightly informative, and definitely an easy day.
  • Building a Virtual Lab with Hyper-V

    I needed to get this one on Hyper-V, so I decided to document the process. I’ve put together a series that looks at the steps I took.

    This will fill in as I go through the process, so if there’s something you don’t see, it’s coming.

  • Powershell in a Month Day 16 – Working with many objects

    This is part of my Powershell Challenge, to learn more about PowerShell (PoSh) using the Learn Windows Powershell 3 in a Month of Lunches book by Don Jones.

    One of the great powers of T-SQL is that we can owrk with many rows at once. We use a query to tell the server what we want done to a group of objects, and then the query executes against every row that matches the filters. It’s this power that makes SQL much more efficient than the RBAR method of moving through a cursor structure. This chapter introduces the ways in which we do that with Powershell.

    The first part of the chapter is about batch commandlets, using things like Stop-Process receiving a pipeline of objects from something like Get-Process. I like their favorite example, which I’ve yet to run. I need to do this in a VM and see what happens.
    Get-Process | Stop-Process
    That’s an easy concept for me, and I see how valuable this is. However not all of the cmdlets we call will handle batches. The next part of the chapter examines WMI and the Invoke-WmiMethod call, which can take a series of objects as well. I somewhat dread the idea of needing to use this method, or worse, having to call a series of methods in which I have to pass in all the parameters. It’s good to know that I need the $null parameter for those parameters I don’t want to deal with, but it’s an ugly syntax. It’s handy to know this is an option, but I think I’ll be doing MSDN research for those times that I need to work with these methods.
    The next part of the chapter looks at the ForEach-Object syntax. I’ve seen this in scripts, and I could guess what i does, but this starts to make sense now and I can more easily decode the scripts when I see them. Along with the $_ marker to represent an object, the whole structure of PoSh is becoming easier to read.
    The chapter isn’t long and and starts to spend time comparing the various methods of enumeration. That’s helpful. Seeing how the same end result can be achieved in different ways is very handy. The lab was easy, though I had to skip the WMi stuff as I was unwired at the time that I went through this chapter. However I had an idea of what to do, just no way to look up the WMI classes.