Tag: SQLNewBlogger

  • Changing the Origin in Git–#SQLNewBlogger

    I needed to show a customer how to migrate from Azure DevOps to GitHub recently, and to smooth this process, we needed to repoint the origin remote.

    Another post for me that is simple and hopefully serves as an example for people trying to get blogging as #SQLNewBloggers. You can see all posts on Git as well.

    Changing the Remote

    When you want to see remotes, you run this code:

    git remote –v

    As you can see, I have my origin pointed to Azure DevOps..

    2023-12-19 11_46_54-cmd

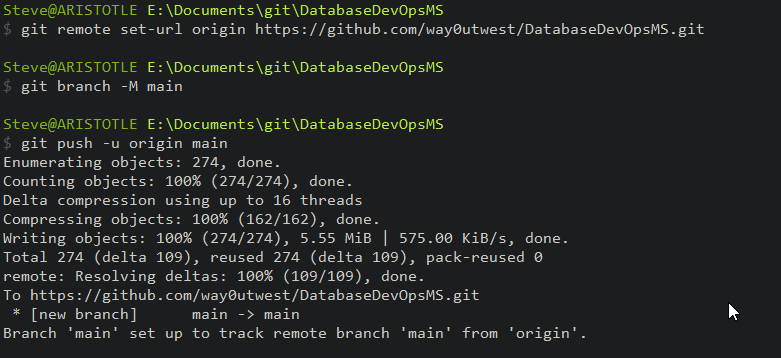
    Now, I can delete and add back the origin remote if I want, but there is an easier way. I’ll use the set-url parameter with this code:

    git remote set-url origin https://github.com/way0utwest/DatabaseDevOpsMS.git

    This points the origin to my new remote in GitHub. Once I run this, I’ll set the branch and push, as the GitHub repo is empty. This pushes everything to GitHub and voila, I’ve got code there.

    2023-12-19 11_48_22-cmd

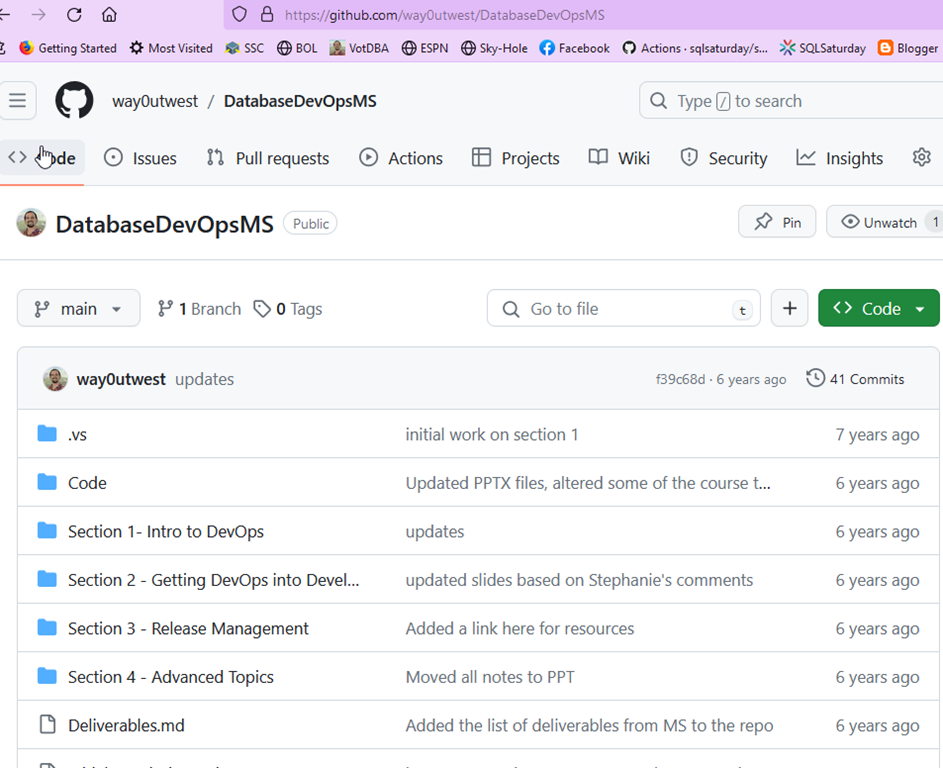
    You can see this online

    2023-12-19 11_35_59-way0utwest_DatabaseDevOpsMS — Mozilla Firefox

    SQL New Blogger

    I had to write this up in more detail for a customer as documentation. You might do this at work for someone, but I grabbed this focused, small piece of this and created my own blog, reusing a few screenshots.

    Note: Don’t reuse screenshots of company assets. Recreate this in your own space.

    This took me only about 5 minutes to write up after the other work was done. You could easily do that.

  • Using DATETRUNC–#SQLNewBlogger

    I saw someone using DATETRUNC recently in some code and realized I hadn’t really looked at this function before. It’s one that was added in SQL Server 2022, though it’s been in other platforms for years.

    This post looks at the basics of this function.

    Another post for me that is simple and hopefully serves as an example for people trying to get blogging as #SQLNewBloggers.

    DATETRUNC

    One of the challenges for years in SQL Server is dealing with dates. For years we had datetime, and we used this for everything. However, this includes dates and times. The DATE datatype was eventually added, but we have lots of legacy data that includes dates and times mixed together.

    Since we don’t always want dates and times, or we want some cutoff, the DATETRUNC function was added to help us. This function takes two parameters, a datepart and a date.

    The datepart is any sort of potion of a datetime value. This can be quarters, months, hours, minutes, milliseconds, etc. Of course, all as singular, not plural.

    The date is any valid date type: smalldatetime, datetime, date, time, datetime2, datetimeoffset.

    We use it like this:

    SELECT GETDATE(), DATETRUNC(DAY, GETDATE())

    That returns on my system:

    ----------------------- -----------------------
    2023-12-13 18:23:00.337 2023-12-13 00:00:00.000

    If you look, this has truncated the date at the day, replacing everything after this with zeros. In this case, the datetime output of getdate() is turned into a date value.

    Another example, what if I want to get rid of seconds? I can do that easily like this:

    SELECT GETDATE(), DATETRUNC(SECOND, GETDATE())

    ———————– ———————–
    2023-12-13 18:24:19.557 2023-12-13 18:24:19.000


    You can see that I have the same date and time for hours, minutes, and seconds, but I’ve gotten rid of the partial seconds.

    Using This Function

    This is a function, and using it in the WHERE clause (or ON) can impact performance. This often (maybe always) messes up your index usage. However, we often want to display something cleaner, and perhaps in the SELECT clause we want to just order things and show hours.

    I might to show shipments during an hour and this code helps:

    SELECT TOP 50
            o.OrderID
          , o.Customer
          , o.OrderDate
          , DATETRUNC (HOUR, o.OrderDate) AS OrdersByHour
    FROM dbo.[Order] AS o
    ORDER BY o.OrderDate desc;

    770         0SW2LZ               2023-12-12 23:14:35.220 2023-12-12 23:00:00.000
    830         X6SYVULIQQGMZLPN0LL  2023-12-12 23:08:22.450 2023-12-12 23:00:00.000
    731         NB3                  2023-12-12 23:03:45.120 2023-12-12 23:00:00.000
    883         UDPUS144L1SL1Z1KPD   2023-12-12 22:56:25.100 2023-12-12 22:00:00.000
    171         M28F5EYLB            2023-12-12 22:56:07.950 2023-12-12 22:00:00.000
    775         P9LET1EBNFN          2023-12-12 22:53:48.580 2023-12-12 22:00:00.000
    209         S1I4Q04SUOP          2023-12-12 22:19:49.470 2023-12-12 22:00:00.000
    654         5O4GBEWZZVDII        2023-12-12 22:14:53.420 2023-12-12 22:00:00.000
    967         NWA9                 2023-12-12 22:06:04.400 2023-12-12 22:00:00.000
    458         JYD4TZU0S35XPW3WD7   2023-12-12 22:01:14.350 2023-12-12 22:00:00.000
    584         ZDQ2J348SRI6D3HW     2023-12-12 21:59:34.910 2023-12-12 21:00:00.000
    718                              2023-12-12 21:54:32.740 2023-12-12 21:00:00.000
    359         I4YDWI               2023-12-12 21:54:20.970 2023-12-12 21:00:00.000


    If I look at these results, it’s cleaner to see the hours, and this certainly is easier than parsing our and combining years, months, days, and hours.

    There are likely lots of uses for cleaning up output, or limiting input parameters to certain groups of date values. Definitely a function I can see myself using to simplify and group date data in new ways.

    SQL New Blogger

    This post took me about 15 minutes to write, including the mockup of some code and generating some data with SQL Data Generator. I did a basic exploration of this function, and wrote about it.

    This is something you can easily do, and include your own thoughts on where you’d use this. Search your old code for DATEPART stuff and see if you can replace some complex expressions with DATETRUNC.

  • Executing One Line in VSCode–#SQLNewBlogger

    I wrote about arrays in PowerShell last week, but I realized one of the things I did while experimenting was look up how to run code a line at a time. I’m sure you can Google for that, but I decided to write a post to help me remember this in the future.

    Another post for me that is simple and hopefully serves as an example for people trying to get blogging as #SQLNewBloggers.

    Running One Line

    Years ago I saw someone demonstrating either PoSh or Python in Visual Studio and they were walking through code a line at a time. I thought that was cool, like a debugger, but not being in the debugger.

    To do this in VS Code, we use F8. Here’s how it works. Create a new PoSh file in VS Code. You should see something like this:

    2023-12-01 14_01_11-● oneline.ps1 - Visual Studio Code_thumb[1]

    Now put the cursor on line 1, anywhere. I’ll put it after the = sign. If I press F8, I see this:

    2023-12-01 14_02_03-● oneline.ps1 - Visual Studio Code_thumb[1]

    Pretty cool. I just ran that line.

    One Hassle

    The one hassle is the focus is now in the terminal. However CTRL+Tab gets me back to the editor, though it would go to the Welcome tab here. However, supposedly CTRL+1 or 2 would work.

    My problem is those are mapped to ZoomIt, which is always running Sad smile

    I hit CTRL+Tab twice, however, and I was back in my editor. I could go down one line and hit F8 to run the second code.

    2023-12-01 14_02_52-● oneline.ps1 - Visual Studio Code_thumb[1]

    Try it for yourself.

    If you have a better method, let me know.

    SQL New Blogger

    After the last post, I spent less than 10 minutes setting up a new file and then capturing some code. A couple google searches helped me figure out the terminal/editor switching.

    This was fun, but it also showcased some learning and something that will help me in my work. You could easily do the same thing, with any tool you use at work. Show how you experiment and learn.

  • Removing a PowerShell Array Element–#SQLNewBlogger

    I saw an article on this and realized I had no idea how to do this, so I decided to practice a bit. I don’t work with PoSh arrays a lot, but with more and more DevOps work needing complex scripting, PoSh is a better environment for me than bash. At least for now.

    This post looks at the basics of creating an array and then removing elements.

    Another post for me that is simple and hopefully serves as an example for people trying to get blogging as #SQLNewBloggers.

    Creating a PoSh Array

    Creating an array in PowerShell is relatively easy. I use a variable and the @ sign, enclosing the elements inside parenthesis with comma separation. In code, that looks like this:

    $servers = @("server1", "server2", "server3")

    or this:

    $numbers = @(1,2,3,4,5,6,7,8,9,10)

    If I were to reference an array, I’d get results like this:

    PS E:\Documents\git\sqlsatwebsite> $servers
    server1
    server2
    server3

    PS E:\Documents\git\sqlsatwebsite> $numbers[2]
    3


    As you can see, I can get all elements or a single element with an index inside brackets. Note that the array is zero indexed as the index of 2 returns the third element.

    In code, I might use other variables to represent the index or maybe to store the results of an array. If I were trying to brute force the removal of an element, I might decide to copy items one at a time (iterating through the index and skipping the copy if I reached an item to skip.

    Removing an Element – Kind of

    The way to remove this is deceptively simple. The article referenced above shows the easy way, which is to set an element to $null. I’d have never thought of that, as I’d assume this would leave the element, but change the key.

    If I want to remove 5, I’d set $numbers[4]=$Null. Crazy, but let’s see this work. First, I’ll iterate the array, printing each index and the value with this code:

    for ($i = 0; $i -lt $numbers.Length; $i++) {

    Write-Host $i : $numbers[$i]


    }

    When I run this, I see these results:

    0 : 1
    1 : 2
    2 : 3
    3 : 4
    4 : 5
    5 : 6
    6 : 7
    7 : 8
    8 : 9
    9 : 10

    Now, I’ll run this:

    $numbers[4]=$null

    Now we re-run the iteration and see these results:

    0 : 1
    1 : 2
    2 : 3
    3 : 4
    4 :
    5 : 6
    6 : 7
    7 : 8
    8 : 9
    9 : 10

    Hmmm, the element is gone and isn’t. Nothing has moved, and in fact, the value of 6 remains in index 5. If I try to get element at index 4, I get this:

    2023-12-01 13_34_55-Window

    It’s not there, but the spot is held. That’s somewhat what I’d expect.

    Removing an Item – The Better Way

    PowerShell has a lot of flexibility in how variables work and how queries work. I found another blog that helped me understand a few things and experiment. Look at this code:

    $numbers = $numbers | Where-Object { $_ -ne 5}

    If I run my iterator on $numbers now I see:

    0 : 1
    1 : 2
    2 : 3
    3 : 4
    4 : 6
    5 : 7
    6 : 8
    7 : 9
    8 : 10

    That works much better, since I create a new array.

    Arrays in PowerShell are funny things, and the docs show some of the methods available don’t change the size of an array, they just operate on it. There isn’t a remove method, which is interesting. There is a Remove-Item cmdlet, but even the docs say assigning $null is faster. However, it doesn’t get the indexing right.

    If you have a better method, let me know.

    SQL New Blogger

    I spent about 10-15 minutes experimenting in PowerShell on various code elements trying to understand how different methods change the array. I read some docs, and ended up taking another 15 minutes to write this post and copy over some code.

    This was fun, but it also showcased some learning and methodology. You could easily do the same thing, with PowerShell, T-SQL, or any other coding or scripting you do at work. Show how you experiment and learn.