Tag: Azure Devops

  • Get a PAT in Azure DevOps

    I have a presentation recently on Continuous Integration Using Local Agents in Azure DevOps and one of the things I do in there is get a PAT for Azure DevOps to use in configuring an agent. This post shows how to do this, as I found this wasn’t obvious when I was searching out information.

    Azure DevOps Organizations

    In Azure DevOps, at the top level you have an organization. Here’s my way0utwest org.

    2024-12_0298

    In the lower left corner, there is this, which is somewhat hidden. As you can see, it’s next to the bottom projects in my org, just above my Windows bar.

    2024-12_0299

    If I click this, I have lots of settings. I have lots of different things. One would think this would be a place where I could create a PAT for my agent to connect with.

    2024-12_0300

    It’s not.

    If I am setting up an Agent and need a PAT, I need to do to the upper right, under my user settings. This is the second from the right (as of Jan 2025) icon. If I click this, I see PATs.

    2024-12_0301

    Once I click Personal access tokens, I get to this screen. You can see my PATs and a “New” buton in the upper right. Click this to create a new token.

    2024-12_0302

    You get this screen. Apparently this token is only used to register the agent. I’ve usually granted this full access, but I haven’t dived too deep into what happens if I only limit rights. I’ll try that soon. As with any security issue, make sure you know the implications of settings.

    2024-12_0303

    Once you create this, you get a notice that you need to copy this now or lose it. There’s a handy copy button, so use it.

    2024-12_0304

    Summary

    This is a quick post on creating tokens in Azure DevOps. As with any security change, make sure you know what the implications are for creating and using these.

  • Denver Dev Day Oct 2024 Slides

    Here are the slides from my talk today: CI in Azure DevOps

    If you have questions, please feel free to contact me (top menu above).

  • Creating a Test Pipeline in Azure DevOps using a Windows Agent

    A customer was having some trouble getting started with Azure DevOps (AzDO) and building their database, so we took a step back and decided to create a simple test pipeline, so they could get a feel for how things work and then move on to more complex builds.

    This post looks at a basic pipeline on a Windows agent. I assume you have an Azure DevOps account and have created a project.

    This post is part of a series on Azure DevOps. You can click the link to see other posts.

    Setup

    We decided to start with a very simple test to start, using a task to get a directory listing. That’s a nice simple task, and one you can re-use a lot as you try to configure your pipeline.

    We created a new pipeline in our Azure DevOps project. To do this, we went to the Pipelines section of AzDO and selected “New”.

    2024-08_0004

    We next had a screen that showed choices. If you pick a repo, this wants to build a code-first, YAML pipeline. Great for coding and automation, bad for beginners. Select “Use the classic editor” at the bottom. Don’t worry, you can always move to YAML.
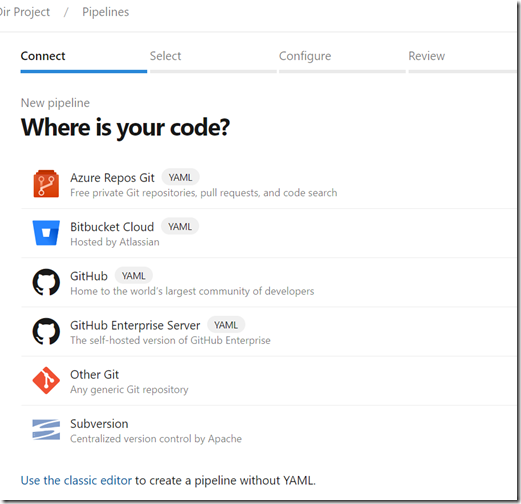
    2024-08_0005

    This takes us to a repository screen. We were working in Azure DevOps, so we can use Azure Repos, but if you used GitHub or some other Git repo on the Internet, you can choose that.

    You can choose to build from other branches, but I tend to start with main, though we often protect main to prevent direct commits. Once you select the repo and branch, click Continue.
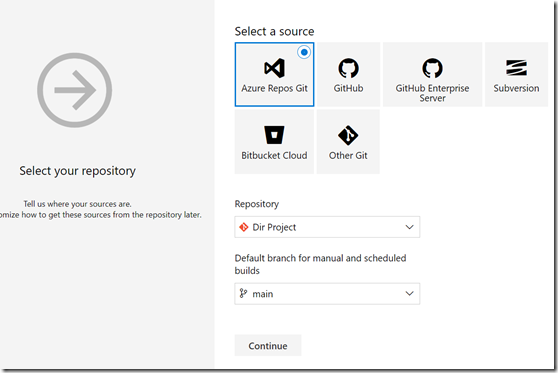
    2024-08_0007

    We now get to choose a template. For teaching someone new, I Start with an empty one. Click Empty job to move on.
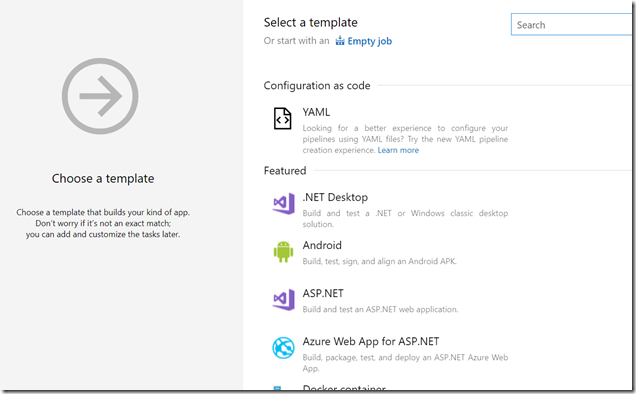
    2024-08_0008

    This gets us a basic pipeline. To orient you, there are multiple tabs, Tasks, Variables, Triggers, Options, History. We don’t need any of these to get started. The Tasks item is highlighted, so we see our tasks.

    The pipeline is the top level element, and most listed ot the left. The “Get Sources, is next, and is part of the pipeline as it downloads the repo. The Agent Job 1 is the container for a series of steps in our task, like a SQL Agent Job that contains steps. We’ll add different steps below here.
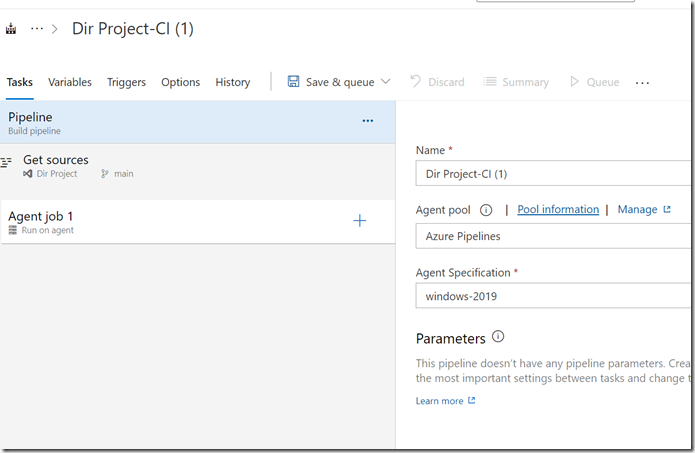
    2024-08_0009

    If you look to the right, you see some edit boxes. These are the top level pipeline settings. The Name is shown at the very top of the image, near the breadcrumb. If I edit this to say “Basic Directory” then this appears at the top.
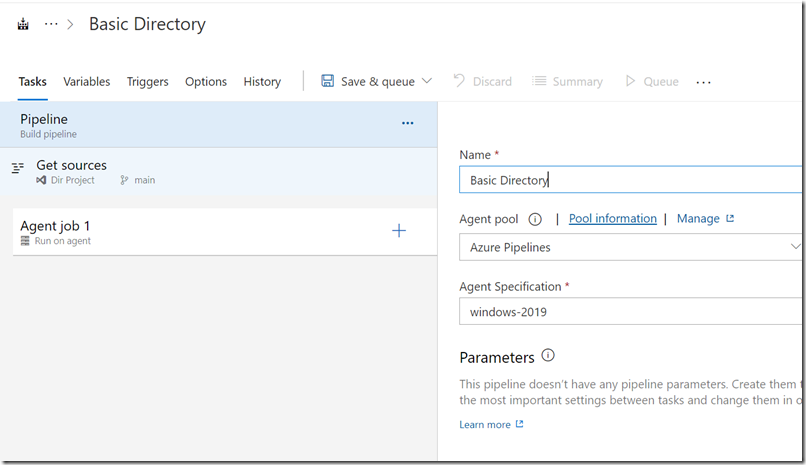
    2024-08_0010

    The Agent pool is the list of possible agents. This defaults to using the Azure hosted agents from Microsoft, but you can create local agent pools if you want things to run inside your infrastructure on VMs instead. I’ll leave this, and I’ll also leave the Agent spec to Windows 2019. There are other options, which you can see.
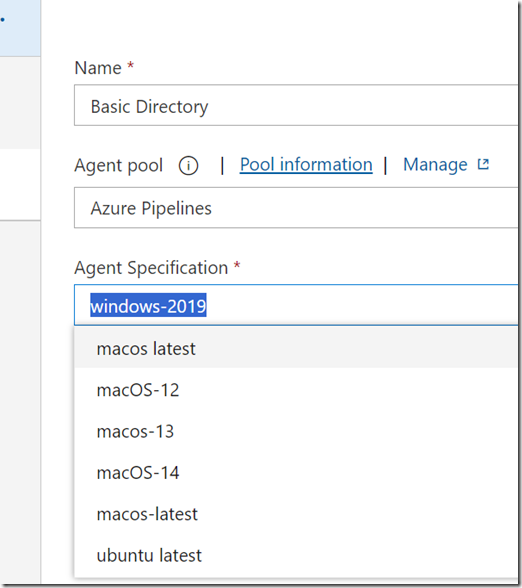
    2024-08_0011

    Note, I am not a fan of using Latest agents. Pick a version that reduce debugging issues. Change this to a later version periodically when you are ready.

    If you click on the Agent job 1, you see some different values on the right. You can rename this agent, or specify a different agent from the pipeline. We’ll leave this alone.
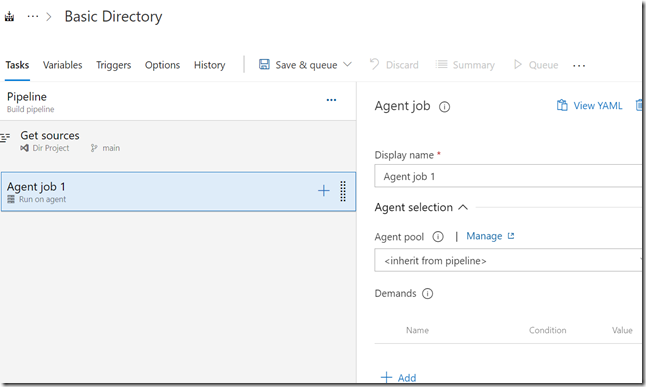
    2024-08_0012

    On the line with Agent job 1, there is a + to the right. This is how we add tasks (steps) under our agent. Click this.
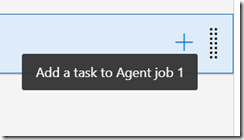
    2024-08_0013

    This brings up a list of tasks to the right. There are a lot of ones listed, and you can add more to your account. We’ll live with this list.
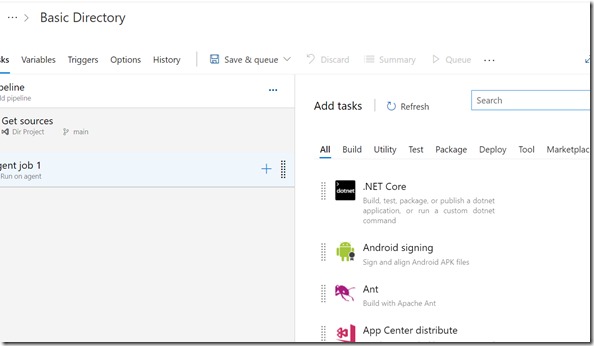
    2024-08_0014

    We could scroll or click the various categories (build, utility, test, etc.), but let’s search. Type “cmd” in the search box. We see a limited list of tasks. We’ll click Add next to the Command Line Script.
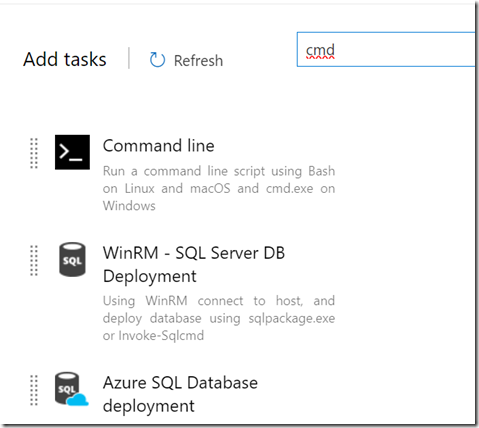
    2024-08_0015

    Once this chosen, it is added to the left under Agent job 1. Click this line to see the various settings on the right.
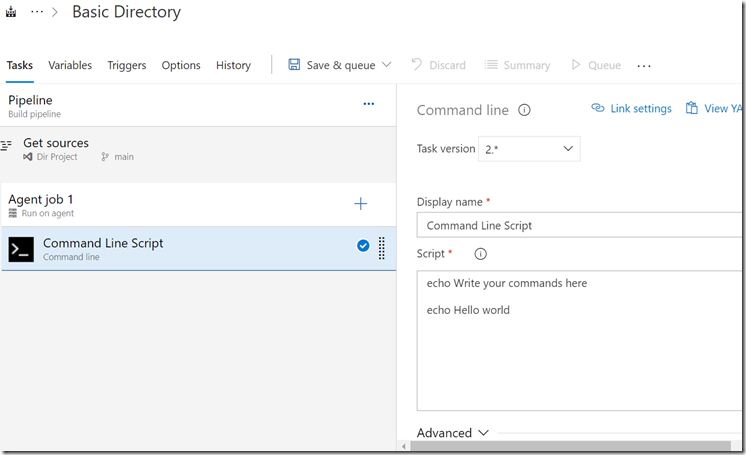
    2024-08_0017

    Let’s configure this. First, we’ll change the name to directory listing. Next, let’s delete everything in the script box and type “dir”. We should see this.
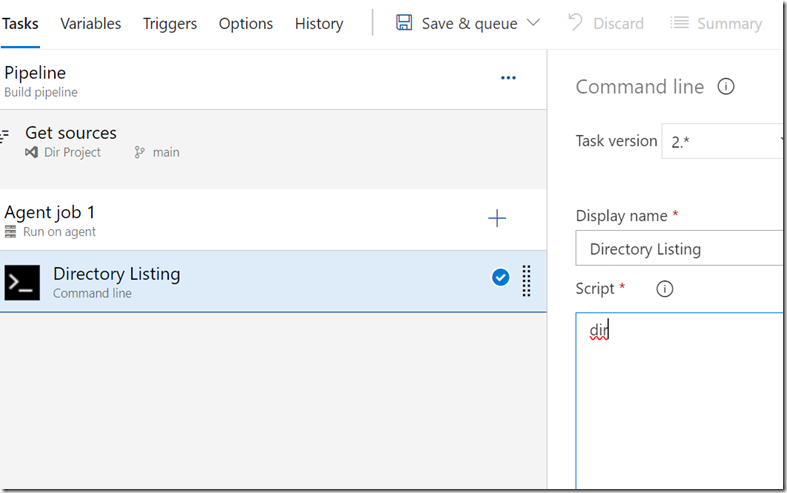
    2024-08_0018

    Now click “Save and queue” at the top. We get to enter a save comment and can configure the run. Just leave the defaults.

    Note: I grabbed this shot, and realized I’d accidentally set the agent to MacOS. I reset that before I continued.
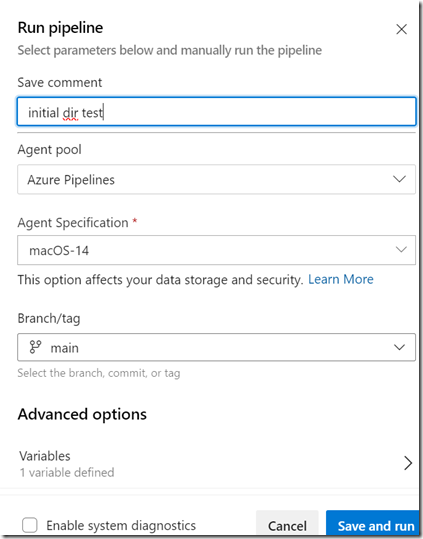
    2024-08_0019

    Once we click Save and run, we should go to the screen that has meta data about this pipeline run. It looks like this. Click the line with the clue clock and Agent job 1.
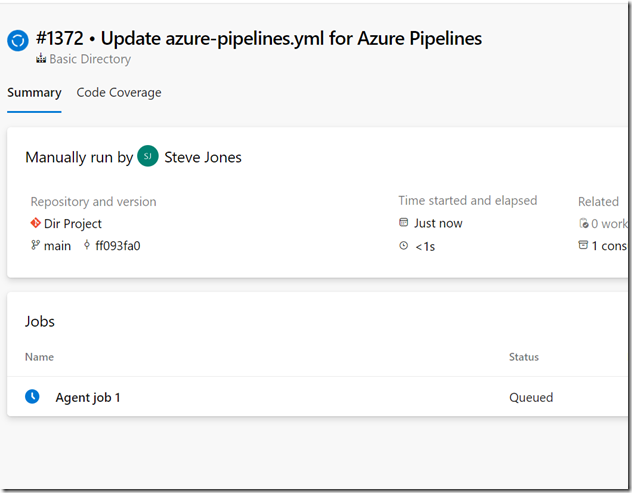
    2024-08_0020

    That should bring up a log listing of the various steps. The listing on the left matches our pipeline steps. Whichever item is selected on the left filters the logs on the right to that info.
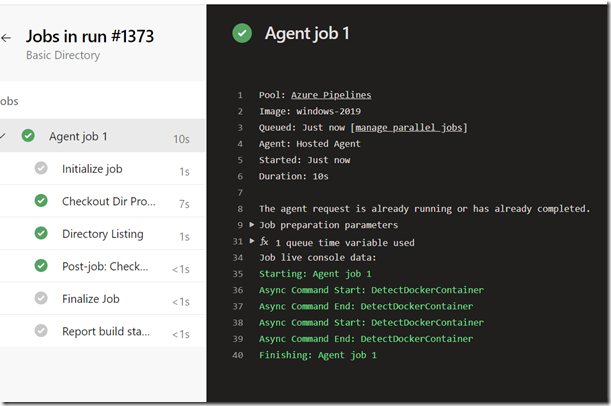
    2024-08_0021

    If we click the directory listing step, we see some info logged and then the command being run.
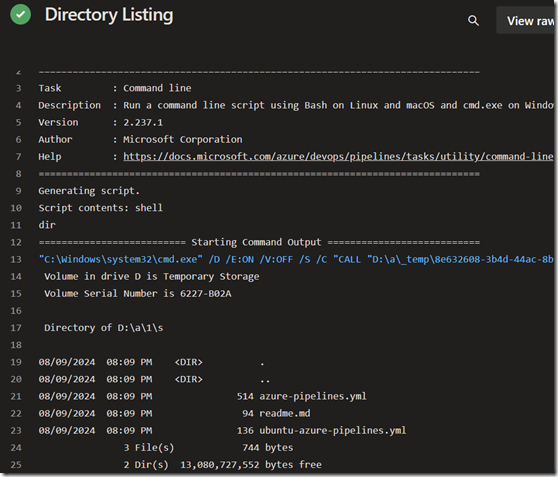
    2024-08_0022

    This directory listing matches what’s in our repo. We can see this easily by clicking on the repo. 2024-08_0024
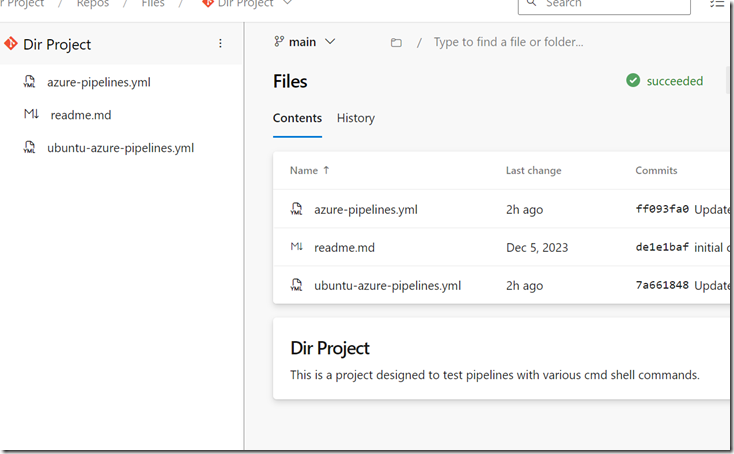
    When the agent runs, the software runs inside the folder of the repo that is downloaded as part of the pipeline. If you want to get another folder listing, useful sometimes as you configure things, just change the dir command.

    Summary

    This is just a basic look at a pipeline and how to set up a simple task. It’s a useful task, and until you have your pipeline working, I’d leave this task in there. Being able to get visibility into the agent machine is often very helpful.

    I’ll look at a few other options in future posts.

  • Set a Runtime Variable in an Azure DevOps Pipeline

    Note: I DO NOT recommend this. Any changes to a pipeline should be in code and through a PR.

    That being said, I know this information is out there and some people need it. The question from a friend was how can they set a variable in an Azure DevOps Pipeline at runtime. This was for testing, and they wanted to change the pipeline behavior to test things when they ran them.

    This post will show how to do this in classic and YAML pipelines. As a scenario, I’m just going to get a directory listing of a folder, and change that at runtime.

    Classic Pipelines

    I know the trend is everything in code. For experimenting and learning, I find this slightly annoying, so I like classic pipelines. I know others do.

    In a classic pipeline, I can set variables. I’ll add a new one and call it myLocation. Over on the far right, there is a checkbox for “settable at runtime”. Check that.

    2024-06-27 14_42_03-Dir Project-CI - Azure DevOps Services

    Now, I’ll add a task to this pipeline that runs a dir, using this variable.

    2024-06-27 14_54_13-Dir Project-CI - Azure DevOps Services

    I can save and run this, and I see the results of c:\Users from a hosted agent.

    2024-06-27 14_50_22-Pipelines - Run 1346 logs

    That’s the default behavior.

    Now, let’s alter this at runtime. When I click “run pipeline, I see this on the right side as a blade. Note the “variables” section below.

    2024-06-27 14_50_50-Pipelines - Runs for Dir Project-CI

    I can click this and see my variables. System.debug is set at runtime by default, but I see my other one.

    2024-06-27 14_53_35-Media Player

    If I click this, I can change the location. I’ll set this to c:\.

    2024-06-27 14_50_40-

    When I let this run, note I get different results.

    2024-06-27 14_53_10-Pipelines - Run 1347 logs

    I’ve changed behavior at runtime.

    YAML Pipelines

    In a YAML pipeline, I don’t have tabs or variables. Instead, I just get a script of sections, like this.

    2024-06-27 14_58_28-Dir Project - Pipelines

    I can alter this to add a variable by looking in the upper right, where I see a “variables” button. Click this.

    2024-06-27 14_59_05-Dir Project - Pipelines

    I get a list of variables, which is none in this case. I’ll click “New variable”.

    2024-06-27 14_59_08-Media Player

    This gives me a dialog where I can enter the information. Note I can set a default as well as let users override this with a checkbox.

    2024-06-27 14_59_19-Dir Project - Pipelines

    When I save this, I see my variable.

    2024-06-27 14_59_24-Dir Project - Pipelines

    Now, I can alter my script. I’ll add this as $(myLocation), where I surround the variable name with a $ and ().

    2024-06-27 14_59_53-Dir Project - Pipelines

    I can validate and save this, which I do.

    2024-06-27 14_59_57-GPT-5 delayed , TikTok kill switch , inside Netflix's video encoding ‍ -

    It’s valid, because I typed well, but this really should go through a PR. Since I’m testing, and I’d approve the PR, I’m doing it in main. I shouldn’t do this in any org.

    2024-06-27 15_00_02-Dir Project - Pipelines

    Now when I run the pipeline, I have the variables item where I can change the variable.

    2024-06-27 15_00_17-Dir Project - Pipelines

    I can also set this variable in YAML, like this:

    2024-06-27 15_06_50-azure-pipelines.yml - Repos

    However, if I set that value, I can’t change this at runtime. Here’s the runtime screen.

    2024-06-27 15_07_56-Window

    I can use a parameter instead. I’ll use this structure:

    2024-06-27 15_23_21-Dir Project - Pipelines

    When I run this, I see a new box:

    2024-06-27 15_18_50-Dir Project - Pipelines

    I can override this “Dir location”. When I set this to c:\, I see these results:

    2024-06-27 15_25_19-Pipelines - Run 20240627.17 logs

    Summary

    I’ve shown how to configure a variable to be set at runtime, both in classic and YAML pipelines.

    Note, this a place an administrator can make a mistake, or run rogue, without review. This is not recommended. Put all pipeline changes through a PR.